
I learn so much on the internet, and the tutorial and tips from Holly Knott really helped me a lot. I modified some of her hints, using things I had at home and I continue to work on my quilt photography skills every time I take a pic.
For the book I flew to Wisconsin to work with the staff photographers at Krause and what an experience! Those photographers must have had several hundreds of thousands of dollars in equipment, excellent professional training and the creative nature to do so many photos justice. I was in awe.
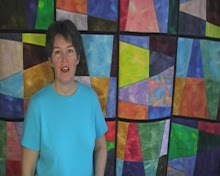
Because I wanted to submit a few of my own photos for the book I tried to learn as much as possible. So, here's a little tour of my quiltroom/bunny room/photography studio.
The wall has a piece of rough textured fleece stapled to it; there's a photography grey card pinned to that and all I usually do (for small scale photos - not full sized bed quilts) is smooth the fabric onto the fleece, or put it on with 3-4 pins. The poles that you see are from a rolling closet rack purchased at WalMart for about $11. I like this a lot because I can use it for storage too, when it's not being used for lighting. Suspended from the ceiling are 2 cheap florescent lamp fixtures with daylight rated bulbs. Clamped to the rolling closet rack are 2 cheap clamp lamps with expensive daylight rated florescent bulbs. All this is connected to a power strip with an on/off switch so it's only turned on right when I take a photo.
When I'm done with the pic, I unplug the clamp lamps and drape their cords over the top of the rack (remember, this is also the bunny room and bunnies chew cords) and roll it aside. You can see my Quilting Table in there too. The bins against the wall store my threads and the shelves on the wall have a few scrap bins.


Sweetpea Pods Sew Along
-
Join us for our upcoming sew along! We’re making Sweetpea Pods starting on
Tuesday, August 22. You can join in at anytime! When you sign up for the
sew alo...
2 years ago


No comments:
Post a Comment